
Write

Beginner
Getting started
Tutorial

ICP supports a wide range of applications and architecture types. They can range from a single canister to complex, multi-canister projects and everything in between.

You can begin writing and structuring your application using one of two primary workflows:

  • Standard workflow: The developer writes both the frontend and backend code, then deploys both to ICP as canisters.

  • Framework-based workflow: An external framework is used to help facilitate creating and deploying canisters. Learn more about frameworks.

Standard workflow

Choosing the programming language for the backend

The backend stores the application’s data and contains the core logic. Several languages are supported, such as:

  • Motoko: Supported by DFINITY. Motoko is production-ready and was specifically designed to onboard developers onto ICP and leverage the actor-based programming model of ICP. It is a high-level language with a garbage collector and syntax that is similar to TypeScript. Examples of production canisters that use Motoko include ICDex and CycleOps. Learn more about using Motoko.

  • Rust: Supported by DFINITY. Currently, Rust is the language with the most production coverage for ICP applications. All system canisters, such as the DAO governing ICP, the ICP ledger, and the Bitcoin and Ethereum integration canisters, are written in Rust. This language gives the developer full control over all aspects of the canister, starting from performance to memory management. The only disadvantage of Rust is that it is lower-level compared to other languages and requires more expert programming skills to write safe and secure code. Learn more about using Rust.

  • TypeScript (beta): Supported by Demergent Labs under the name Azle. Azle is in beta. Please check the Azle website for more information.

  • Python (beta): Supported by Demergent Labs under the name Kybra. Kybra is in beta. Please check the Kybra website for more information.

  • C++: Supported through the C++ CDK.

Choosing a web framework for the frontend

The HTTP Gateway protocol of ICP allows browsers to load web assets such as JS, HTML, and CSS from a canister via HTTP. This means that web assets can be stored fully onchain and developers don’t need to use traditional centralized web hosting to serve the UI of their application.

Svelte, React, and Vue have been used successfully in production. dfx v0.17.0 and newer can be used to generate project templates that include one of these frameworks.

Having no frontend at all is also a valid option for canisters that don’t have a UI and are callable only by users or other canisters. Learn more.

Using an existing sample project

You can also obtain projects from other sources, such as ICP Ninja or the sample repository. If you are obtaining a project from a source other than the dfx new command, confirm that the project's root directory contains a dfx.json file that defines the project's canisters.

Framework-based workflow

Juno

Juno is a community project that is tailored for Web2 developers. It takes care of hosting code and data in canisters such that developers can write Web3 applications using familiar Web2 concepts and patterns. For more details, please follow the official Juno documentation.

Bitfinity EVM

Bitfinity EVM is tailored for Solidity developers. It is a canister that runs an instance of the Ethereum virtual machine and allows developers to upload and execute canisters written in Solidity. For more details, please follow the official Bitfinity documentation.

Creating a project

Before writing canister code, you need to create a project by running the command:

dfx new PROJECT_NAME --type=motoko
cd PROJECT_NAME

Options for the --type flag are motoko, rust, azle, and kybra. Using Rust, Azle, or Kybra may require additional dependencies to be installed if you have not developed with those languages in your environment before. View their corresponding documentation for more information.

You should be in a directory that contains a file called dfx.json. This file is used to configure your project's settings. It includes the project's canister definitions, such as the canister's type, source code file, and dependencies.

dfx.json
{
  "canisters": {
    "PROJECT_NAME_backend": { // Backend canister name
      "main": "src/PROJECT_NAME_backend/main.mo", // Backend canister source code
      "type": "motoko" // Canister language
    },
    "PROJECT_NAME_frontend": { // Frontend canister name
      "dependencies": [
        "PROJECT_NAME_backend"
      ],
      "source": [
        "src/PROJECT_NAME_frontend/dist" // Frontend canister source code
      ],
      "type": "assets", // All frontend canisters will have type 'assets' regardless of the frontend framework used
      "workspace": "PROJECT_NAME_frontend"
    }
  },
  "defaults": {
    "build": {
      "args": "",
      "packtool": ""
    }
  },
  "output_env_file": ".env",
  "version": 1
}

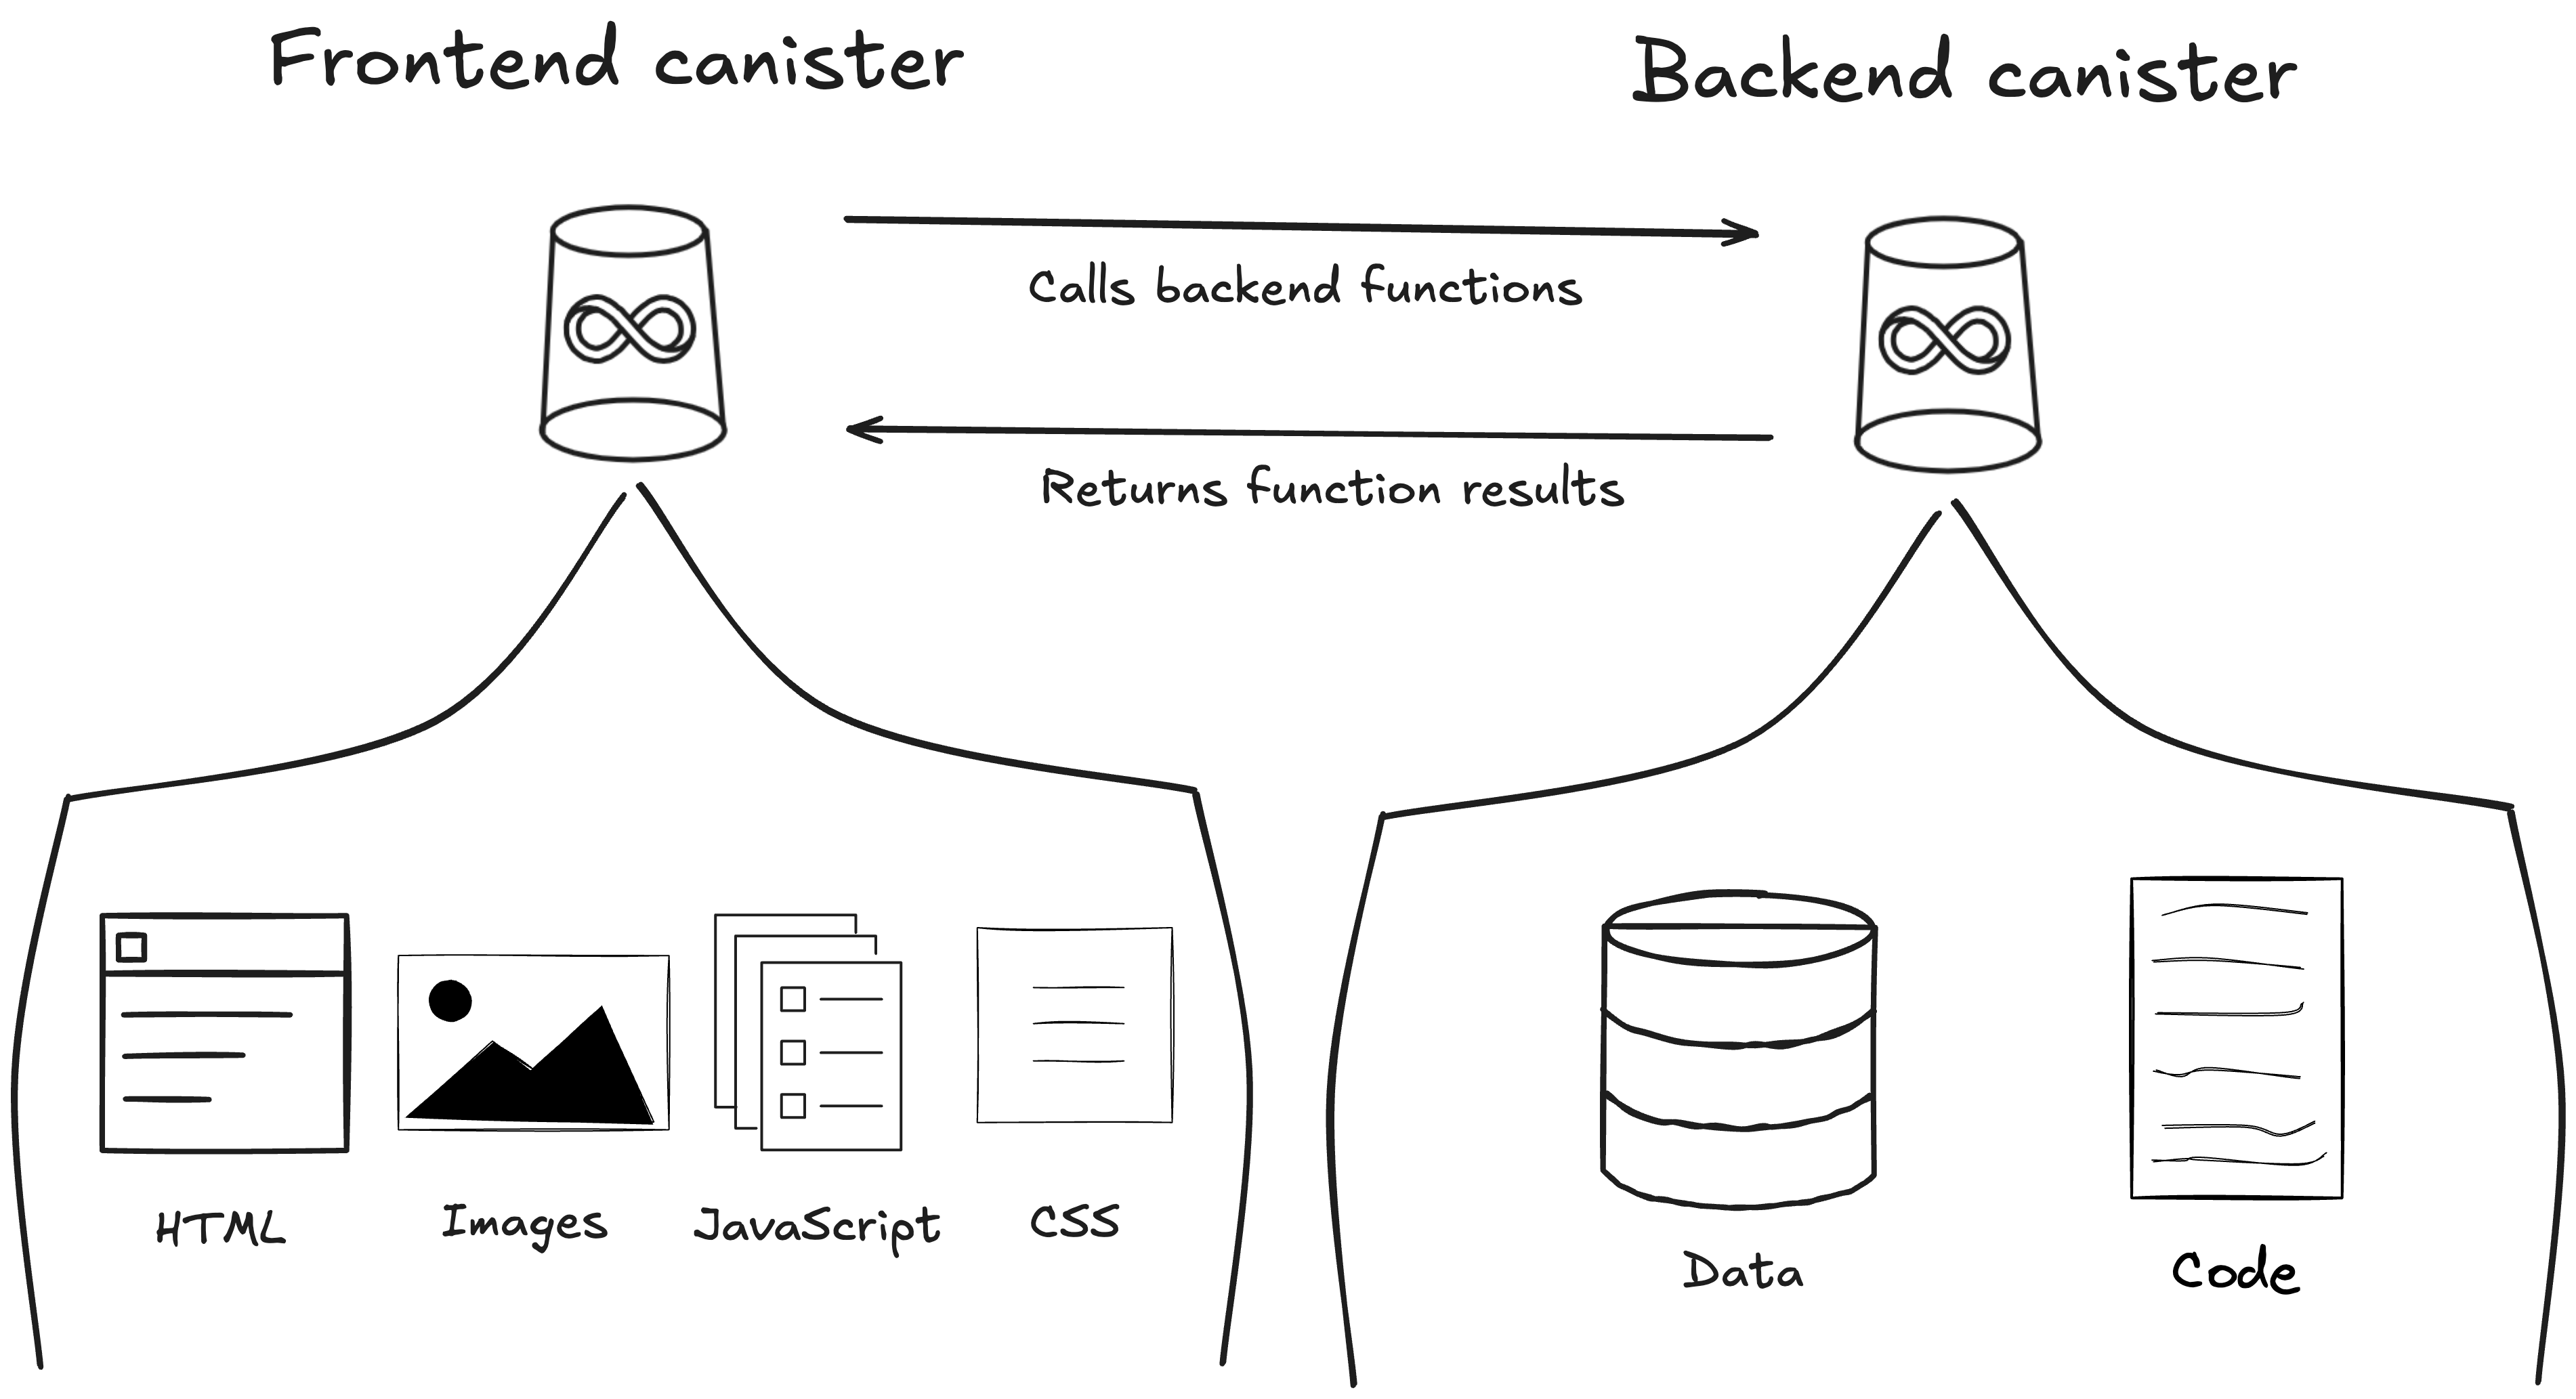
Default project architecture

The backend canister stores the dapp's functions and core logic.

The frontend canister stores the app's frontend assets, including files such as HTML, CSS, JavaScript, React, images, and videos.

  Application architecture

Writing canister code

This section will focus on writing backend canister code. If you want to explore some examples with application frontends, view the ICP Ninja projects.

Download and install an IDE or code editor. VS Code is recommended.

Step 1: Open the backend canister source code file in your code editor.

For Motoko projects, this file will be src/PROJECT_NAME_backend/main.mo. For writing Motoko code, the Motoko VS Code extension is highly recommended for syntax highlighting.

For Rust projects, this file will be src/PROJECT_NAME_backend/src/lib.rs.

For Azle or Kybra projects, please refer to their respective documentation for details about their default code files.

If you are using the default template created by dfx, you will see the following default "Hello, world!" code:

src/PROJECT_NAME_backend/main.mo
actor {
public query func greet(name : Text) : async Text {
    return "Hello, " # name # "!";
  };
};

Step 2: Add randomness.

A key feature of ICP is its ability to generate onchain randomness using a verifiable random function (VRF) and chain-key cryptography. In each round of consensus on a subnet, the VRF is evaluated using the number of the round as input, producing a fresh set of random bytes. Then, the bytes are used as the seed for a pseudorandom number generator (PRNG), called random tape, which uses chain-key cryptography to create a random, unique value for each canister that requests it. Through this process, it is impossible to predict future outputs.

To use randomness in your canister, you need to make a call to the raw_rand method of the management canister.

To demonstrate how to use randomness, you will create a simple app that generates a random number.

Remove the existing code in your backend source code file. Then, insert the following:

src/PROJECT_NAME_backend/main.mo
import Nat8 "mo:base/Nat8";
import Debug "mo:base/Debug";
import Blob "mo:base/Blob";
import Nat "mo:base/Nat";
// The management canister's principal ID is "aaaaa-aa".
import IC "ic:aaaaa-aa";

actor {
// Create a stable variable to store the current random number.
// Stable variables persist across canister upgrades.
stable var currentRandomNumber : Nat = 0;

// Create a function to generate a new random number.
// This function calls the raw_rand method of the management canister.
// Then it uses the random bytes returned to generate a random number.
private func generateNewNumber() : async () {
let randomBytes = await IC.raw_rand();
if (randomBytes.size() > 0) {
// Use the first byte to generate a number between 0 and 255
let bytes : [Nat8] = Blob.toArray(randomBytes);
currentRandomNumber := Nat8.toNat(bytes[0]);
Debug.print("Generated new random number: " # Nat.toText(currentRandomNumber));
};
};

// Use a query call to get current random number.
public query func getCurrentNumber() : async Nat {
currentRandomNumber
};
}

Step 3: Add a timer.

At this point, the canister code generates a random number and stores it in a variable. You can retrieve that value with a query function. To demonstrate another feature of ICP, let's add a timer that generates a new random number every 5 seconds.

Timers are used to automatically execute actions after a specified interval or delay, enabling canisters to perform autonomous tasks.

Add the following highlighted line to your backend code:

src/PROJECT_NAME_backend/main.mo
import Nat8 "mo:base/Nat8";
import Debug "mo:base/Debug";
import Blob "mo:base/Blob";
import Nat "mo:base/Nat";
// The management canister's principal ID is "aaaaa-aa".
import IC "ic:aaaaa-aa";
import Timer "mo:base/Timer";

actor {
// Create a stable variable to store the current random number.
// Stable variables persist across canister upgrades.
stable var currentRandomNumber : Nat = 0;

// Create a function to generate a new random number.
// This function calls the raw_rand method of the management canister.
// Then it uses the random bytes returned to generate a random number.
private func generateNewNumber() : async () {
let randomBytes = await IC.raw_rand();
if (randomBytes.size() > 0) {
// Use the first byte to generate a number between 0 and 255
let bytes : [Nat8] = Blob.toArray(randomBytes);
currentRandomNumber := Nat8.toNat(bytes[0]);
Debug.print("Generated new random number: " # Nat.toText(currentRandomNumber));
};
};

// Use a query call to get the current random number.
public query func getCurrentNumber() : async Nat {
currentRandomNumber
};

// Initialize timer to generate a new number every 5 seconds
let timer = Timer.recurringTimer(#seconds 5, generateNewNumber);
}

Step 4: Retrieve external data.

HTTPS outcalls can obtain data from any external source, including other blockchains, traditional Web2 APIs, and other web services. When HTTPS outcalls are used locally, the returned result is not validated since the local replica is only a single node. HTTPS outcalls used on the mainnet validate the returned result through the subnet's consensus, providing security that the data obtained has not been maliciously tampered with during transport.

HTTPS outcalls currently support GET and POST HTTPS methods.

To demonstrate how to create and send HTTPS outcalls, let's add an HTTPS outcall GET request that returns information about ICP's daily stats from the ICP API. Insert the following highlighted code into your backend source code file:

src/PROJECT_NAME_backend/main.mo
import Nat8 "mo:base/Nat8";
import Debug "mo:base/Debug";
import Blob "mo:base/Blob";
import Nat "mo:base/Nat";
// The management canister's principal ID is "aaaaa-aa".
import IC "ic:aaaaa-aa";
import Timer "mo:base/Timer";
import Cycles "mo:base/ExperimentalCycles";
import Text "mo:base/Text";
import Types "Types";

actor {
// Create a stable variable to store the current random number.
// Stable variables persist across canister upgrades.
stable var currentRandomNumber : Nat = 0;

// Create a function to generate a new random number.
// This function calls the raw_rand method of the management canister.
// Then it uses the random bytes returned to generate a random number.
private func generateNewNumber() : async () {
let randomBytes = await IC.raw_rand();
if (randomBytes.size() > 0) {
// Use the first 2 bytes to generate a number between 0 and 255
let bytes : [Nat8] = Blob.toArray(randomBytes);
currentRandomNumber := Nat8.toNat(bytes[0]);
Debug.print("Generated new random number: " # Nat.toText(currentRandomNumber));
};
};

// Use a query call to get the current random number.
public query func getCurrentNumber() : async Nat {
currentRandomNumber
};

// Initialize a timer to generate a new number every 5 seconds.
let timer = Timer.recurringTimer<system>(#seconds 5, generateNewNumber);


// Define a public function to get the daily stats about ICP from the ICP API.
public func getIcpInfo() : async Text {

// Define the API endpoints to obtain data from.
// This example uses the IC API, but any API endpoint can be used.
let url = "https://ic-api.internetcomputer.org/api/v3/daily-stats?format=json";
let transform_context : Types.TransformContext = {
function = transform;
context = Blob.fromArray([]);
};

// Define the http_request components.
let http_request = {
url = url;
max_response_bytes = null; // Optional.
headers = [];
body = null; // Optional.
method = #get;
transform = ?transform_context;
};

// HTTP outcalls require cycles to be attached to the call.
Cycles.add<system>(20_949_972_000);

// Execute the HTTP outcall.
let http_response = await IC.http_request(http_request);

let response_body: Blob = http_response.body;
switch (Text.decodeUtf8(response_body)) {
case null { "No value returned" };
case (?y) { y };
};
};

// Define a transform function to return the status response and body.
public query func transform(raw : Types.TransformArgs) : async IC.http_request_result {
{
status = raw.response.status;
body = raw.response.body;
headers = [ ];
};
};
}

This HTTP outcalls code references custom types, as indicated by the import statement import Types "Types"; and code statements like Types.TransformContext. Custom type definitions can be created from within the main.mo file, but for types that may be used in several different source code files, it can be beneficial to define them in a single Types.mo file, and then import them as needed.

Create a new file called src/PROJECT_NAME_backend/Types.mo that contains the following:

src/PROJECT_NAME_backend/Types.mo
import IC "ic:aaaaa-aa";

module Types {

// HTTPS outcalls have an optional "transform" key. These two types help describe it.
// The transform function may transform the body in any way, add or remove headers, modify headers, etc.

public type TransformArgs = {
response : IC.http_request_result;
context : Blob;
};

public type TransformContext = {
function : shared query TransformArgs -> async IC.http_request_result;
context : Blob;
};

}

Step 5: Putting it all together.

At this point, we have three functions in this code that demonstrate three different ICP features: onchain randomness, timers for autonomous execution, and HTTPS outcalls to obtain data. Let's edit the code to use them in conjunction with one another rather than separately:

  1. Onchain randomness will be used to generate a number between 133000 and 133255. This number will be used to select a recent [NNS proposal]((/docs/building-apps/governing-apps/nns/overview) at random.

  2. The random number will be passed into the HTTPS outcall. The HTTPS outcall will query the IC API endpoint for details about that specific proposal number.

  3. Timers will be used to generate a new number every 30 seconds and send a new HTTPS outcall every 32 seconds.

Replace the backend canister source code with the following revised code:

src/PROJECT_NAME_backend/main.mo
import Timer "mo:base/Timer";
import Nat8 "mo:base/Nat8";
import Debug "mo:base/Debug";
import Blob "mo:base/Blob";
import Nat "mo:base/Nat";
import Cycles "mo:base/ExperimentalCycles";
import Text "mo:base/Text";
import Types "Types";

// The management canister's principal ID is "aaaaa-aa".
import IC "ic:aaaaa-aa";

actor {
// Create a stable variable to store the current random number.
// Stable variables persist across canister upgrades.
stable var currentRandomNumber : Nat = 0;
stable var proposalId : Text = "1";

// Create a function to generate a new random number.
// This function calls the raw_rand method of the management canister.
// Then it uses the random bytes returned to generate a random number.
private func generateNewNumber() : async () {
let randomBytes = await IC.raw_rand();
if (randomBytes.size() > 0) {
// Use the first byte to generate a number between 133000 and 133255 (recent proposal numbers)
let bytes : [Nat8] = Blob.toArray(randomBytes);
currentRandomNumber := Nat8.toNat(bytes[0]) + 133000;
proposalId := Nat.toText(currentRandomNumber);
};
};

// Define a public function to get proposal information.
public func getIcpInfo() : async Text {

// Define the API endpoints to obtain data from.
// This example uses the IC API, but any API endpoint can be used.
let url = "https://ic-api.internetcomputer.org/api/v3/proposals/" # proposalId ;
let transform_context = {
function = transform;
context = Blob.fromArray([]);
};

// Define the http_request components.
let http_request = {
url = url;
max_response_bytes = null; //optional for request
headers = [];
body = null; //optional for request
method = #get;
transform = ?transform_context;
};

// HTTP outcalls require cycles are attached to the call.
Cycles.add<system>(20_949_972_000);

// Execute the HTTPS outcall.
let http_response = await IC.http_request(http_request);

let response_body: Blob = http_response.body;
switch (Text.decodeUtf8(response_body)) {
case null { "No value returned" };
case (?y) { y };
};
};

// Define a transform function to return the status response and body.
public query func transform(raw : Types.TransformArgs) : async IC.http_request_result {
{
status = raw.response.status;
body = raw.response.body;
headers = [ ];
};
};

private func printResults() : async () {
Debug.print("Generated new random proposal number: " # Nat.toText(currentRandomNumber));
let result : Text = await getIcpInfo();
Debug.print("Proposal info obtained through HTTPS outcall: " # result);
};

// Initialize timer to generate new number every 30 seconds
let timer1 = Timer.recurringTimer<system>(#seconds 30, generateNewNumber);
// Initialize timer to send an HTTPS outcall and print the results every 32 seconds
let timer2 = Timer.recurringTimer<system>(#seconds 32, printResults);
}

You will still need the Types.mo file created in step 4. You do not need to make any edits to the Types.mo file.

Save your code file, then learn how to deploy the project.